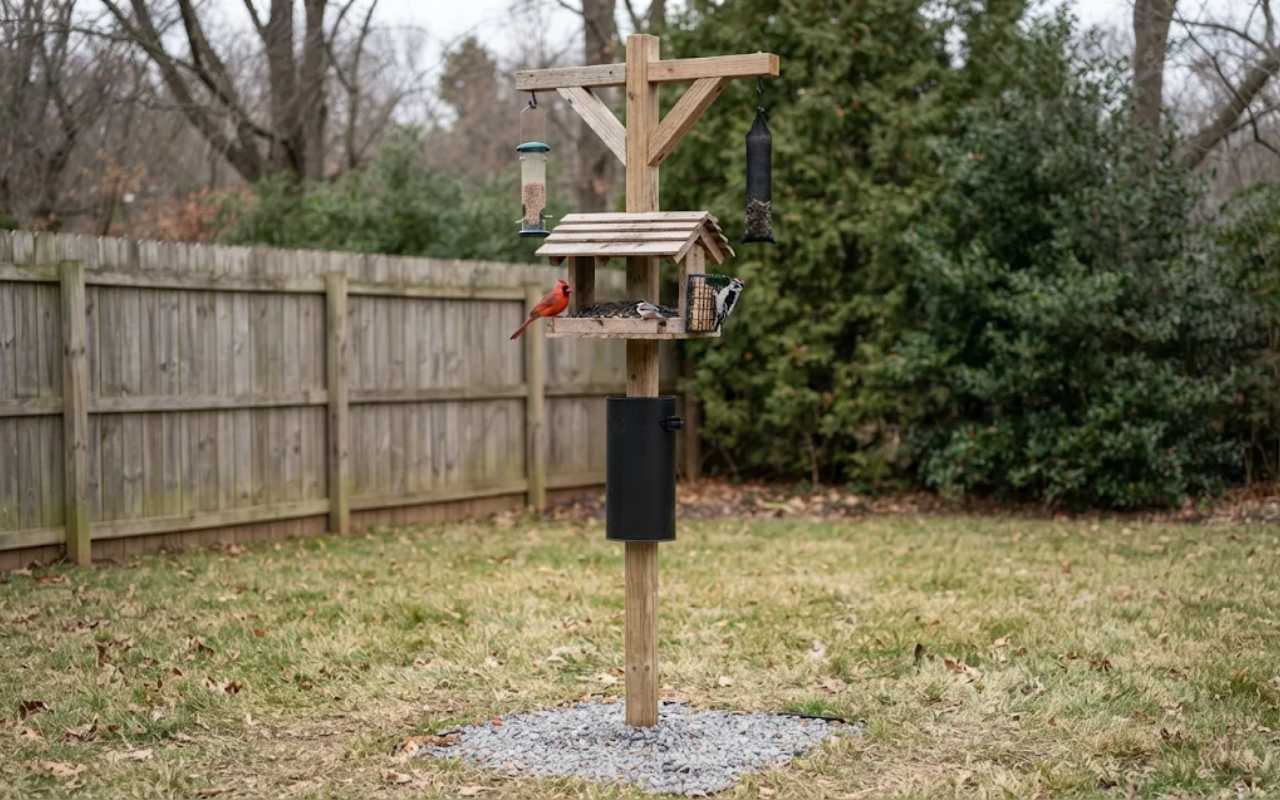
Building a pallet wood bird feeder station turns salvaged shipping slats into a multi-level backyard feeding hub without spending a dime on lumber. Instead of buying separate metal shepherd’s hooks that tip over in wet soil or rust out after two winters, a freestanding timber post anchored in crushed gravel holds a roofed seed hopper, a side-mounted suet cage, and hanging hooks for tube or nyjer feeders all in one footprint.
You can frame, assemble, and weatherproof this entire feeding station in one weekend using two heat-treated pallets, waterproof exterior wood glue, coated deck screws, and basic garage tools. Selecting verified HT (Heat-Treated) pallet boards guarantees the wood is completely free of toxic chemical fumigants so visiting songbirds stay safe year-round.
Quick-Glance Build Summary
Dismantling standard 48×40-inch shipping pallets yields thick 2×4 stringers for your vertical post and cross-arms alongside 1/2-inch deck slats for a sloped roof and drained seed tray. Elevating the central post in compacted crushed gravel prevents ground rot while keeping the station rock-solid in gusty winds.
- Prep & Build Time: 3 to 4 hours (plus overnight drying time for water-based exterior sealer)
- Lumber Source: Two clean, dry HT-stamped (Heat-Treated) hardwood or pine pallets—never use MB (Methyl Bromide) or blue/red rental pallets
- Overall Station Dimensions: 5.5 feet tall above ground (7 feet / 84 inches total post length with 18 inches buried in gravel), 28-inch top cross-arm, and a 12×10-inch covered platform tray
- Core Hardware: ANSI/HPVA Type I waterproof exterior wood glue, 1-5/8-inch and 2-1/2-inch coated exterior deck screws, two stainless-steel screw eyes, and 1 bag of crushed gravel
- Target Backyard Birds: Northern Cardinals, Black-capped Chickadees, Tufted Titmice, Downy & Red-bellied Woodpeckers, and American Goldfinches
- Safe Yard Placement: 8 to 12 feet from dense shrub cover, and either within 3 feet or more than 30 feet from exterior windows
How to Source Safe, Chemical-Free Pallet Wood
Before cutting a single board, inspect the side stringer stamps on your salvaged pallets to confirm they are safe for wildlife. According to pallet safety and pest-control standards outlined by the USDA Animal and Plant Health Inspection Service (APHIS), international and domestic shipping pallets carry standardized International Plant Protection Convention (IPPC) treatment codes burned into the wood under ISPM 15 rules.
- Look for the “HT” Stamp: Only use pallets stamped HT (Heat-Treated, meaning the wood core was heated to at least 56°C / 133°F for 30 continuous minutes with zero chemical pesticides). Note that KD (Kiln-Dried) is only a moisture-reduction label—a kiln-dried pallet is only safe if it also carries the official HT stamp.
- Reject “MB” and Rental Pool Pallets: Never use pallets stamped MB (fumigated with toxic methyl bromide), blue CHEP or red PECO rental pallets (which remain corporate property and often carry industrial coatings), or pallets stained with oil, antifreeze, or chemical spills.
- Choose Clean Hardwood or Thick Pine Slats: Oak, poplar, and thick southern yellow pine pallet boards hold exterior deck screws tightly without splitting when pre-drilled.
Pallet Station Components & Cut List
| Station Component | Pallet Lumber Source | Exact Cut Dimensions | Quantity Needed |
|---|---|---|---|
| Main Vertical Post (84 in.) | 2×4 Pallet Stringers (staggered lap) | 48 in. (×3) + 36 in. (×1) laminated | 4 stringer pieces |
| Top Hanging Cross-Arm | 2×4 Pallet Stringer + Offcut | 28 in. arm + two 12 in. angle braces | 1 arm + 2 braces |
| Platform Tray Rim | 1/2-in. Deck Slats | 12 in. (×4) & 10 in. (×4) | 8 slat pieces |
| Gable Roof Uprights | 1/2-in. Deck Slats | 14 in. long (30° angled top peak) | 2 slat pieces |
| Overhang Roof Panels | 1/2-in. Deck Slats | 15 in. long (overlapped clapboard style) | 6 slat pieces |
Tools and Hardware Checklist
Gathering waterproof wood adhesives, rust-resistant fasteners, and non-toxic exterior protection keeps your reclaimed timber station standing through rain, snow, and freeze-thaw cycles:
- 2 Clean HT-Stamped Pallets (48×40 inches): Yields four 48-inch 2×4 stringers and 12+ 1/2-inch deck slats
- ANSI/HPVA Type I Waterproof Exterior Wood Glue (such as Titebond III): Required for laminating pallet stringers into a moisture-proof vertical post
- Pry Bar, Claw Hammer, and Reciprocating Saw (or Jigsaw): For cleanly separating pallet slats without splitting the wood grain
- Cordless Drill with 1/8-Inch Pilot Bit & Driver Bit: Pre-drilling every screw hole is mandatory so thin pallet boards do not crack
- Coated Exterior Deck Screws & Trim Screws: Small boxes of 2-1/2-inch deck screws (for post lamination and cross-arms), 1-5/8-inch deck screws (for tray framing), and 1-1/4-inch trim screws (for thin roof slats)
- 1/4-Inch Hardware Cloth (or Window Screen) & Staple Gun: Lines the bottom of the seed tray for instant rain drainage
- 2 Stainless-Steel Closed Screw Eyes & 1 Wrap-Around Squirrel Baffle: Mounted under the cross-arm for hanging tube feeders and blocking climbing squirrels
- Zero-VOC Exterior Waterborne Clear Sealer: Protects the outer roof and post from moisture rot without toxic solvent fumes
Step-by-Step Pallet Wood Bird Feeder Station Blueprint
To build a sturdy pallet wood feeding station, harvest and sand your HT boards, laminate four pallet stringers with a staggered lap joint into a solid 7-foot post, build a drained seed tray with a pitched roof, bolt on your upper hanging cross-arm, and anchor the base in crushed gravel.
Step 1: Dismantle Pallets and Sand Rough Splinters
Pry off 12 clean deck slats (each roughly 3.5 to 4 inches wide) and save four straight 48-inch 2×4 stringers. Remove every nail using a claw hammer or punch, or use a reciprocating saw with a metal-cutting blade to slice rusted nails flush between the slats and stringers. Sand all cut edges and perching rims with 80-grit followed by 120-grit sandpaper so rough wood splinters never injure delicate bird feet.
Step 2: Laminate Stringers into a Solid 7-Foot (84-Inch) Center Post
Because standard pallet stringers are only 48 inches long, laminating two layers with an offset lap joint creates a rock-solid 84-inch (7-foot) 4×4 post with zero weak horizontal seams:
- Cut one 48-inch stringer down to 36 inches (saving the 12-inch offcut for your diagonal braces).
- For the first layer, butt one 48-inch stringer and the 36-inch stringer end-to-end on a flat surface to reach 84 inches total.
- Apply a generous coat of ANSI/HPVA Type I waterproof exterior wood glue along the face, then lay two uncut 48-inch stringers side-by-side over the first layer (trimming 12 inches off the top end so both layers match at 84 inches—putting the two butt joints 12 inches apart).
- Clamp tightly and drive staggered 2-1/2-inch exterior deck screws every 8 inches from both faces.
Step 3: Build the Drained Platform Seed Tray
Cut four slats to 12 inches and four slats to 10 inches to frame a rectangular perimeter rim (2.5 inches tall so seeds stay put in high winds). Staple a 12×10-inch rectangle of 1/4-inch galvanized hardware cloth (or fiberglass window screen) tightly across the bottom frame, then screw two bottom support slats underneath to sandwich the mesh—this open mesh floor lets rainwater drain immediately so seeds never sit in stagnant puddles.
Step 4: Frame the Sloped Overhang Roof
Cut two 14-inch vertical gable posts and fasten them to the narrow 10-inch sides of your seed tray, angling the top ends at a 30-degree pitch so snow and rain shed off cleanly. Fasten six 15-inch pallet slats overlapping slightly like clapboard siding across both roof slopes using 1-1/4-inch exterior trim screws, leaving a 2-inch eaves overhang on every side to shield the seed basin below. Mount the finished roofed tray onto the side of your main post roughly 4.5 feet above ground level using four 2-1/2-inch deck screws driven through the back gable upright.
Step 5: Mount the Cross-Arm, Suet Bracket, and Squirrel Baffle
Cut a 28-inch cross-arm from a leftover stringer and screw it horizontally across the top of your main vertical post using four 2-1/2-inch deck screws reinforced with two 45-degree diagonal knee braces cut from your leftover 12-inch stringer offcut. Thread two stainless-steel screw eyes into the underside of the cross-arm (at least 10 inches out from the center post) for hanging tube or nyjer feeders, and screw a simple 5×5-inch wooden backing plate onto the opposite side of the post to hold a wire suet cage.
Step 6: Seal Exterior Surfaces and Set the Post in Gravel
Brush two thin coats of zero-VOC waterborne exterior sealer onto the outer roof slats, post, and cross-arm—leaving the interior seed tray raw and unsealed so birds never peck at dried finish flakes. Dig an 18-inch-deep post hole, pour 4 inches of crushed gravel in the bottom for drainage, plumb the 84-inch post upright (leaving 66 inches / 5.5 feet above grade), backfill tightly with crushed gravel, and slide a wrap-around squirrel baffle onto the post 4 feet above the ground just below the seed tray.
Safe Placement and Weekly Cleaning Tips
Even the best-built wooden feeding station needs smart yard placement and regular sanitation to keep local songbirds safe from predators, window strikes, and avian diseases.
- Follow the 8–12 Foot Shrub Cover Rule: Position your station 8 to 12 feet away from dense evergreens or shrubs so chickadees and cardinals have immediate hawk escape cover without giving neighborhood cats a hidden ambush spot directly below.
- Prevent Window Collisions: Follow placement standards from the Cornell Lab of Ornithology by installing your post either within 3 feet of exterior windows or more than 30 feet away from large glass panes.
- Scrub and Sanitize Every Two Weeks: Sweep empty hulls out of the mesh tray every few days. Every two weeks, brush out the fixed wooden seed tray and saturate the wood and mesh thoroughly in place with a 1:9 household bleach-to-water solution using a spray bottle or sponge, let it sit wet for 10 minutes, flush thoroughly with a garden hose, and let it air-dry completely before refilling (removable hanging tube feeders and wire suet cages can be unhooked and soaked in a 5-gallon bucket of the same 1:9 solution). For seasonal seed pairings across multiple levels, see our guide on how to design multi-tier winter bird feeding stations.
Frequently Asked Questions About Pallet Wood Bird Feeder Stations
Do I need to seal pallet wood before putting it outside?
Yes, applying two coats of a zero-VOC, water-based exterior acrylic or polyurethane sealer to the outer roof, post, and cross-arm prevents rain and snowmelt from soaking into porous pallet grain and splitting the wood during winter freezes. Always leave the inside of the seed tray bare and unsealed so foraging birds never ingest flaking finish.
How do I keep squirrels from climbing a wooden bird feeder post?
Install a wide cylindrical or torpedo-style squirrel baffle around the vertical post with the top lip positioned at least 4 feet above the ground (below your seed tray and suet cage), and make sure the entire station sits at least 8 to 10 feet away from deck railings, fences, or overhanging tree branches that squirrels can jump from.
How long will a pallet wood bird feeder station last outdoors?
A properly sealed HT hardwood pallet station laminated with ANSI/HPVA Type I waterproof glue and set in compacted crushed gravel (rather than moisture-trapping soil) typically lasts 4 to 6 years outdoors. Replacing the thin roof slats or bottom screen mesh takes less than 15 minutes whenever weathered boards eventually wear out.